Reviewing transcriptions
Reviewers double check transcriptions after transcribers complete the transcription on a DataScribe item and submit it for review. you will either approve the transcription or send it back to the transcriber to correct.
Find records to review
There are multiple ways to find the records for review. The easiest way is to look under My Projects and select All Items needing review under the dataset you wish to review.
Once you reach a dataset page, you can filter for items that need review.
As a reviewer, you will see all the filter options available to transcribers as well as “Items that need review” and “Items that I reviewed.”
Select the “Items that need review” option, click the Filter button to see only the items that need review.
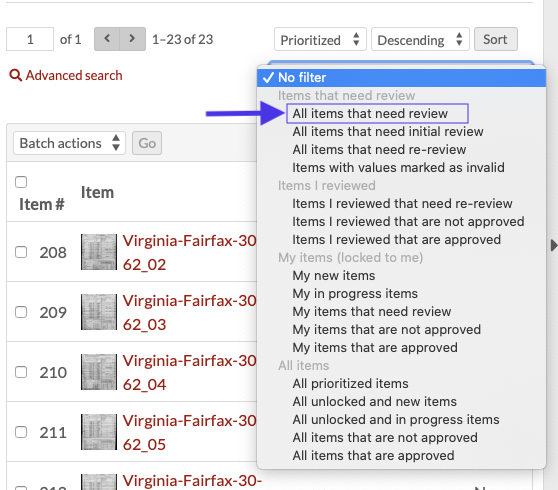
You can sort these items based on title, the date the item was submitted for review, the item’s review history, and if the item is prioritized or not.
Reviewing items and records
Once you find the item to review, select the item title to view the records page. Your project guidelines should determine the relationship between records and items.
A red exclamation point icon next to any record number indicates a problem with the required fields in the records. Other transcription issues, such as misspellings, accidentally skipping over fields, or illegible sections require you to check the entire form.
It is possible to scroll through the record table to see the entries without the item image, but this depends on the level of review the project guidelines require.
At this point, reviewing a transcription is a lot like transcribing one. Click the pencil icon to go to the DataScribe form.
You can check Needs Work and leave notes on the record. If you are transcribing multiple records per item, the Record actions on the right-hand side will let reviews mark the specific record.
You can leave notes on the item level under Item Actions. From here, you will click “save… and return to records.”
Set a review status
Setting a Review status for the item is your last step. The item must be set either approved or not approved.
Under the Review status, select “Mark as approved” or “Mark as not approved”.
If the item is not approved, you should leave a note in the item or record to direct the transcriber on what issues to correct and to mark only the areas in need of review when the item is resubmitted.
Finally, click “save” to ensure your changes are saved.